5 diy budget-friendly bed frame ideas for men's bedrooms
Home Decor Products,  Product Information

5 diy budget-friendly bed frame ideas for men’s bedrooms

5 diy budget-friendly bed frame ideas for men’s bedrooms in 2024

Hello everyone, this is Tuba. Today, I’d like to provide  5 DIY budget-friendly bed frame ideas that you can utilize to update a man’s bedroom without spending a fortune.

When it comes to making a man’s room look cool and contemporary, the bed is typically one of the most expensive items to purchase. But, guess what? You can make amazing bed frames without spending a lot of money at costly retailers. DIY bed frames can look as nice as store-bought ones while saving you money!

So be ready to transform your room with one of these DIY bed frame ideas. Once you’ve got a nice bed, you’ll want to continue decorating. And if you’re considering buying a bed frame, read on until the conclusion for some excellent ideas.

Let’s look at 5 DIY budget-friendly bed frame ideas for men’s bedrooms.

You will love to read:

Modern DIY wood bed frame for your bedroom

5 diy budget-friendly bed frame ideas for men’s bedrooms

1. Minimalist Platform Bed

5 diy budget friendly bed frame ideas for mens bedrooms
source

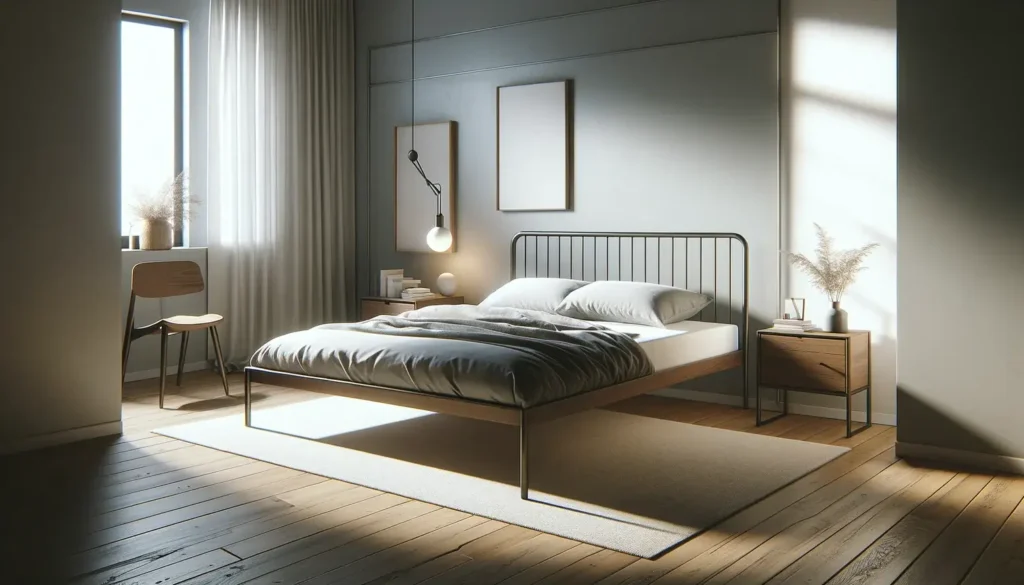
I as of late made a moderate-stage bed for my men’s room, and it turned out extraordinary! Building your bed outline can be a fun venture that spares cash and lets you make a custom piece that fits your space perfectly.

Here’s what you’ll require to get started:

  • Measuring tape
  • Circular saw or hand
  • Drill with bits
  • Sander or sandpaper
  • Wood glue
  • 2.5″ and 3″ wood screws
  • 4 pieces of 8-foot 2x4s
  • 2 pieces of 8-foot 1x4s
  • 1 sheet of 4×8 plywood or MDF (3/4″ thick)
  • Wood stain or paint (optional)

Step-by-Step Guide:

Solid wood platform beds: Measure and cut the frame pieces

First, you’ll need to degree and cut the wooden pieces for your bed outline. You’ll require two longer pieces to coordinate the length of the bed you need (like 75 inches for a twin bed, 80 inches for a full/double bed, or 85 inches for a ruler bed). At that point, cut three to four shorter pieces to coordinate the width of your sleeping cushion (like three pieces for a twin bed, four for a bigger estimate). Utilize a circular saw or handsaw to make, beyond any doubt, your cuts straight and even.

Tall bed frame: Assemble the frame

Let’s collect the outline: Organize the 2×4 pieces on a level surface to make a rectangle. Check if it’s square by measuring from one corner to the inverse corner or utilizing a carpenter’s square. Alter as required to prove beyond any doubt it’s indeed true. Apply wood stick to each corner where the sheets meet. At that point, utilize a drill to make pilot gaps and join each joint with 3-inch wood screws, driving them through the longer sheets into the closes of the shorter ones. Clean up any additional sticks that are crushed out.

Bamboo bed frame: Add center support

Hey! You can include an additional bolster to keep your bed from sinking in the center. Get a few 1×4 sheets and cut them to fit over the width of your bed outline. At that point, utilize sticks and screws to join these sheets’ interior of the longer 2×4 sheets of the outline, right at the center. Utilize screws that are around 2.5 inches long. For larger beds, you might indeed need more bolster. You can include another set of 1×4 sheets approximately 16 inches away from each outline conclusion. This will offer assistance to ensure that, beyond any doubt, your bed remains solid and sturdy.

Wooden bed frame: Measure and cut the platform

First, degree the interior of your outline to get the right estimate. At that point, utilize a piece of ¾-inch plywood or MDF to coordinate those estimations, clearing out almost half an inch to an inch additional on each side. This extra bit will hang over the outline. The stage needs to fit superbly inside the outline, so you might need to smooth or alter the edges after cutting to make sure it fits snugly.

Bed frame wood: Sand and finish

Smooth and Paint: If you note any unpleasant spots or fragments on the wooden outline or stage, use sandpaper or a sander to make them smooth. You can paint or recolor the outline presently to give it a more pleasant wrap-up. I’d recommend a common wood recolor if you like a basic style. Make sure, beyond any doubt, to let the recolor or paint dry sometime soon you move on to the next step.

Japanese platform bed: Attach the platform

Place the cut plywood or MDF board on the best of the outline, making sure, beyond any doubt, it’s centered and hangs over the edges equally. Utilize screws to join the board to the outline by boring little direct gaps and screwing through the foot of the wooden pieces into the board every 6–8 inches.

Add finishing touches

Once the board is solidly put together, your fundamental bed outline is wrapped up! You can personalize it by including your favorite wrap-up, legs, or, indeed, an essential headboard if you’d like.

Tips For Customizing Your Minimalist Platform Bed

  • Adjust the Stature: You can make your bed taller by including another layer of 2x4s or utilizing more extensive sheets for the outline. This lets you customize the bed’s tallness to suit your needs, like making it simpler to get in and out of bed.
  • Create a Headboard: Make your bed seem more special by including a headboard. You can join a piece of recolored plywood or, indeed, lash together wooden sheets for an in-vogue touch.
  • Maximize Capacity Space: If you require additional capacity, raise the bed higher by utilizing pieces or legs. This makes room underneath the bed for putting things flawlessly out of sight.
  • Choose the Right Legs: Choose legs that coordinate your fashion. Peg’s legs deliver a mid-century advanced feel, whereas clip legs make a mechanical see. This choice can truly personalize the general vibe of your bed.

2. DIY Pallet Bed Frame Ideas

5 diy budget friendly bed frame ideas for mens bedrooms
source

Looking to overhaul your room décor on a budget? Building your own DIY bed for men’s bedrooms is an incredible way to add charm and identity to your space without breaking the bank. Here’s a point-by-point direct to offer assistance you make a vogue bed bed step by step:

Materials You’ll Need:

  • Wooden beds (at least 4)
  • Electric saw or hand saw
  • Sandpaper
  • Paint or wood recolor (optional)
  • Screws and a drill
  • Mattress

Step-by-Step Guide:

Step 1: Get ready pallets for a bed

Begin by cleaning the beds completely to expel any earth or flotsam and jetsam. Utilize sandpaper to smooth out unpleasant edges and surfaces. If you favor a more wrapped-up see, you can paint or recolor the beds in a color that complements your room décor.

Step 2: Cut the Pallets

Using an electric saw or hand saw, carefully cut two of the beds in half. These will serve as the headboard and footboard of your bed. Alter the length of these pieces based on your wanted bed size.

Step 3: Collect the Bed Frame

Lay out the two full-length beds on the floor to frame the base of the bed outline. Position the cut beds vertically at each conclusion to make a rectangular outline. Utilize screws and a bore to safely connect the beds at the corners and along the sides.

Step 4: Include Support

To guarantee the bed outline is strong and can back the weight of the sleeping cushion, include extra bolster pillars underneath the base of the outline. You can utilize extra pieces of beds or wooden boards for this reason. Connect these bolster pillars safely utilizing screws.

Step 5: Join the Headboard and Footboard

Take the cut bed pieces that you set aside for the headboard and footboard. Position them vertically at the head and foot of the bed outline. Utilize screws and a penetrate to connect these pieces safely to the outline, guaranteeing they are adjusted and stable.

Step 6: Wrapping up Touches

Once the fundamental structure of the bed is collected, go over the whole piece with sandpaper to smooth out any remaining harsh zones. Apply a coat of paint or wood recolor if craved to improve the appearance of the beds and secure the wood.

Step 7: Put the Mattress

Once the paint or recolor has dried totally, put your sleeping cushion on the beat of the bed outline. Guarantee that the sleeping cushion fits cozily inside the outline and is backed evenly.

Additional Tips:

  • Before beginning, degree the measurements of your sleeping cushion to guarantee that the bed outline will suit it properly.
  • Use high-quality screws and penetrate bits to amass the beds safely for solidity and durability.
  • If you lean toward taller beds, consider stacking extra beds or utilizing bed risers to hoist the frame.
  • Get inventive with the plan by including enriching components such as handles, snares, or indeed built-in capacity spaces underneath the bed, utilizing crevices between the pallets.

Enjoy Your DIY bed!

Building a bed is a cost-effective and fulfilling DIY venture that permits you to customize your room furniture to suit your fashion. Once completed, your carefully assembled bed will be a standout highlight in your room, adding character and a touch of natural charm to your living space.

3. Cardboard bed frame

5 diy budget friendly bed frame ideas for mens bedrooms
source

enjoy DIY systems because they encourage creativity and knowledge while tutoring us on how to turn recyclable coffers into usable goods. DIY systems are excellent for repurposing waste accouterments into commodities worthwhile. I’ll teach you how to create a cardboard bed frame for a men’s room using readily available cardboard.

Supplies Needed:

Materials:

  • Cardboard
  • Bond paper
  • Paper tape
  • Glue sticks

Tools:

  • Glue gun
  • Ruler
  • Measuring tape
  • Knife
Step 1: Constructing the Cardboard Boxes

5 diy budget friendly bed frame ideas for mens bedrooms

Begin by erecting cardboard boxes that measure 21 cm x 21 cm x 27 cm. You may use any kind of cardboard, whether old or new. You’ll bear roughly 32 boxes of this size.

Step 2: Creating the Bottom Layer

5 diy budget-friendly bed frame ideas for men's bedroomsCut and arrange cardboard to produce a nethermost subcaste measuring 200 cm by 96 cm with a consistence of 1 cm. Acclimate the subcaste‘s consistence grounded on the type of cardboard you havehard or soft). Use a bond or a cement gun for a quick setup.

Step 3: Arranging the Boxes

5 diy budget friendly bed frame ideas for mens bedrooms

Position all 32 boxes unevenly on the nethermost subcasteicing harmonious distance between them. Use a bond and a cement gun to secure them togetherFill any gaps with fresh pieces of cardboard if demanded.

Step 4: Constructing the Side Layers

 5 diy budget friendly bed frame ideas for mens bedrooms

Prepare cardboard pieces for the left, right, head, and bottom side layers:

  • Left/right layers: 200cm x 27.5cm x 0.5cm
  • Head/foot layers: 97cm x 27.5cm x 0.5cm Attach these layers around the assembled boxes using a bond and a glue gun
Step 5: Attaching the Side Layers

5 diy budget-friendly bed frame ideas for men's bedrooms

Begin by securing each of the four side layers to the cardboard boxes using a strong tenacious suchlike bond or a cement gunMake sure the layers are forcefully attached to the boxes, icing a stable foundation for the bed frame. This step is pivotal for the structural integrity of the bed, as it forms the sides that will support the weight of the mattress and slumberer.

Step 6: Creating the Top Layer

5 diy budget-friendly bed frame ideas for men's bedrooms

For the top subcaste of the bedfollow the same process used for the nethermost subcasteCut a piece of cardboard to measure 201 cm x 97 cm with a consistency of 1 cm. Use a bond or a cement gun to assemble the top subcastemaking sure it’s securely fixed to the top edges of the side layers. This subcaste will give a smooth and indeed face for the mattress.

Step 7: Finishing Touches

To give your cardboard bed a polished lookapply paper tape recording along all the edges and any rough areas. This will produce a clean finish and help any cardboard edges from being exposedalsoconsider decorating the bed with ornamental paper or other embellishments to epitomize its appearance and make it more visually charming.

Step 8: Completed Bed / Ready to Use

Congratulations! Your cardboard bed is now completed and ready for use. This featherlight and innovative bed frame isn’t only easy to move around but also offers a creative and eco-friendly resting result. It’s a testament to the strength of concinnity — while individual boxes may feel fragiletogether they produce a sturdy structure able to support significant weight.

This DIY design is a great way to unleash your creativity and explore practical design resultsGive it a pass, but flash back to prioritize safety throughout the process.

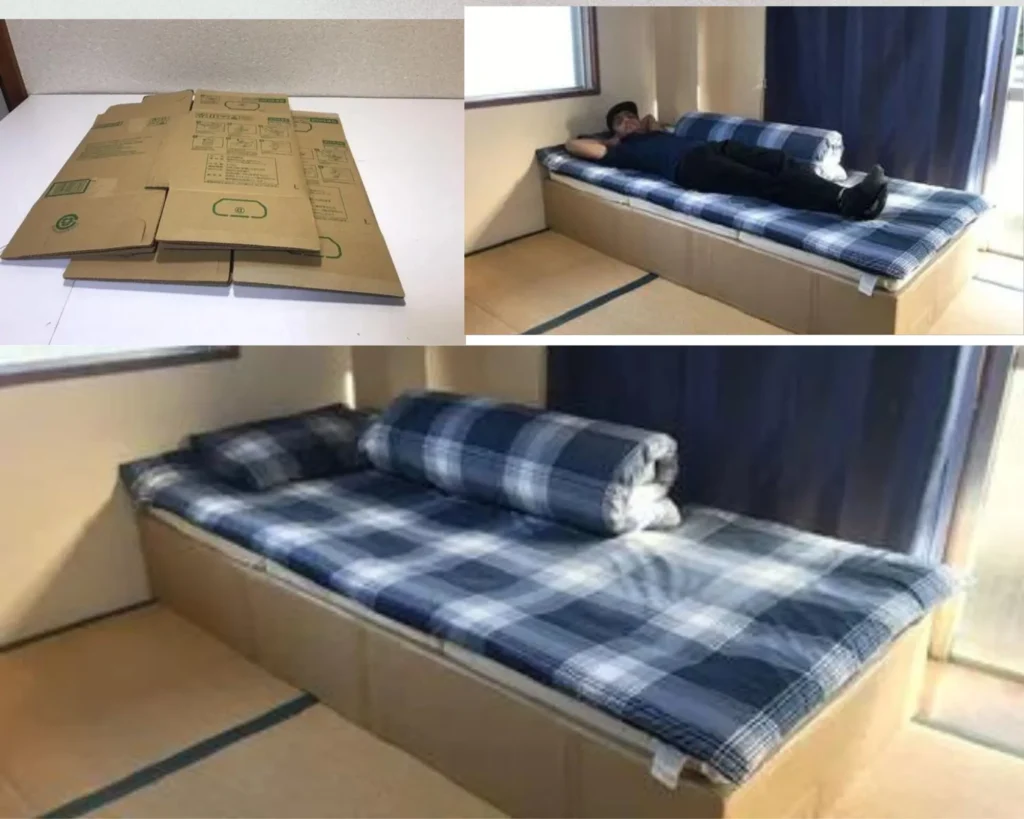
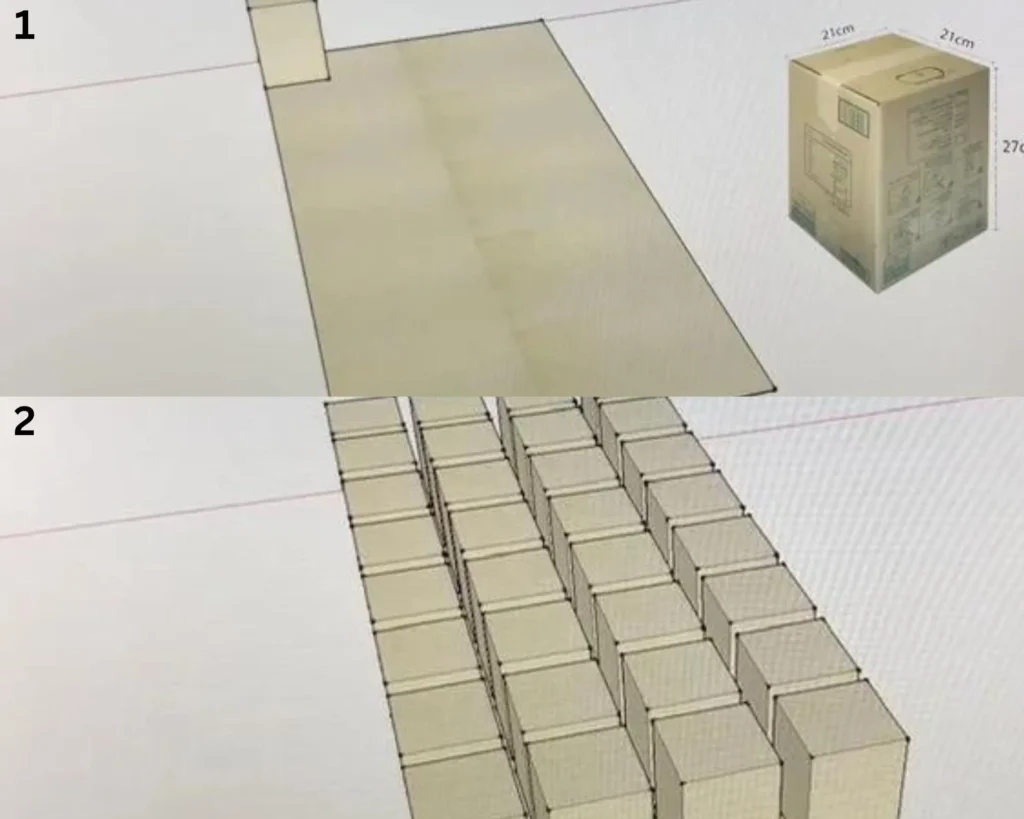
4. Cheap Bed Substitute

I spent $300 on a mattress and didn’t want to spend another $300 on a bed frame or box springs. So, I got creative and used some archive boxes I already had for a low-cost substitute.

Here’s what I did in simple steps for a men’s bedroom:

Step 1: Gather Materials
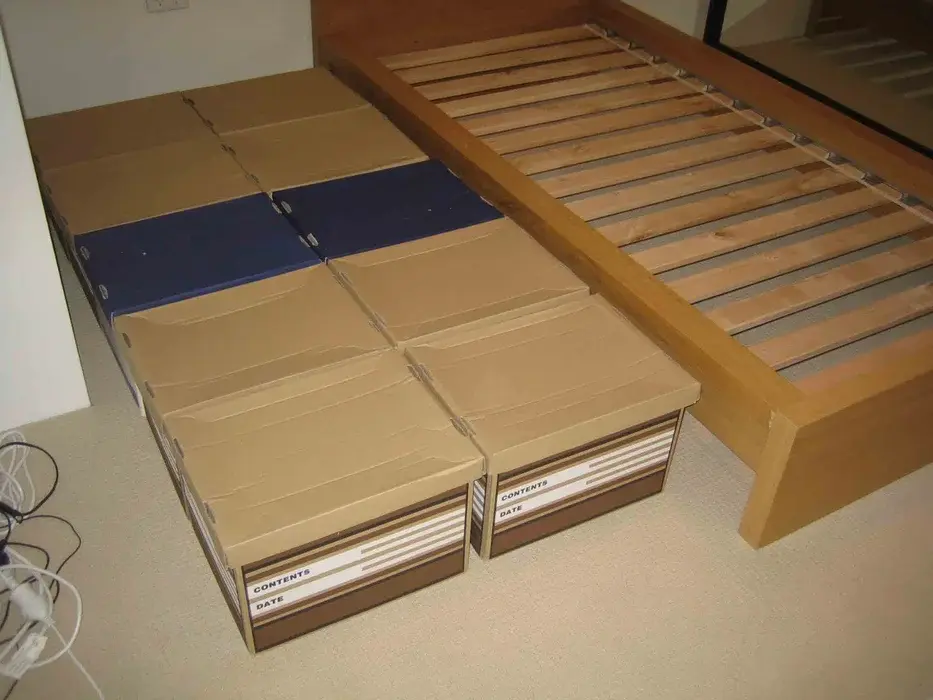
"</p
source

You’ll need:

  • 10 archive boxes (around $10 from places like Officeworks or Staples)
  • 5 minutes of your time
  • Your mattress
  • No shame (for embracing this budget-friendly idea)

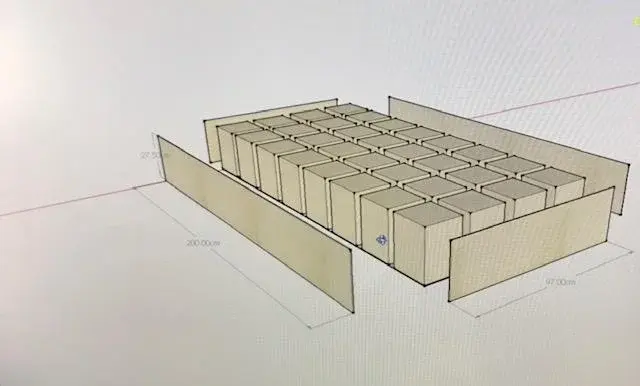
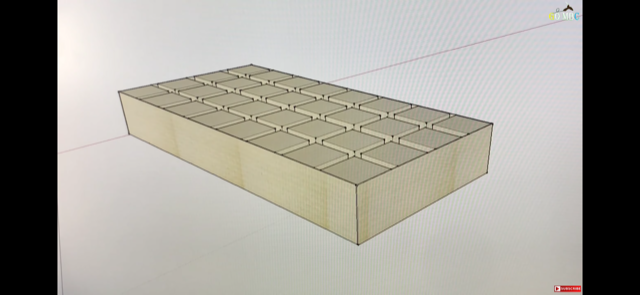
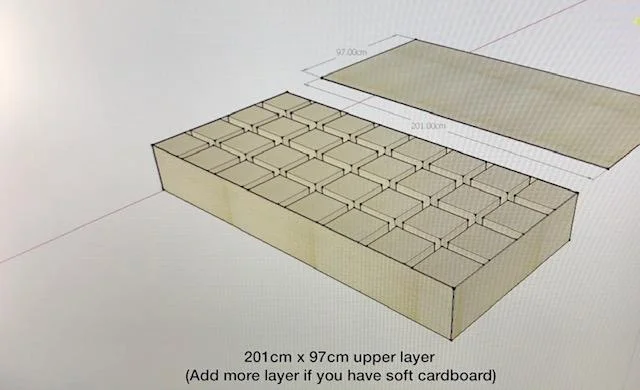
Just arrange the boxes in two rows of five, with lids on (or flip them over if you want to skip using lids). I thought about taping them together for extra security, but they were sturdy enough without it. The boxes held up well when I tested them by jumping on them with the mattress – felt like solid concrete blocks!

Step 2: Cover Up

"</p

I originally thought of skipping this part, but my sister suggested covering the boxes with a bedsheet to improve the appearance. It helped make the setup look nicer and less like a stack of boxes.

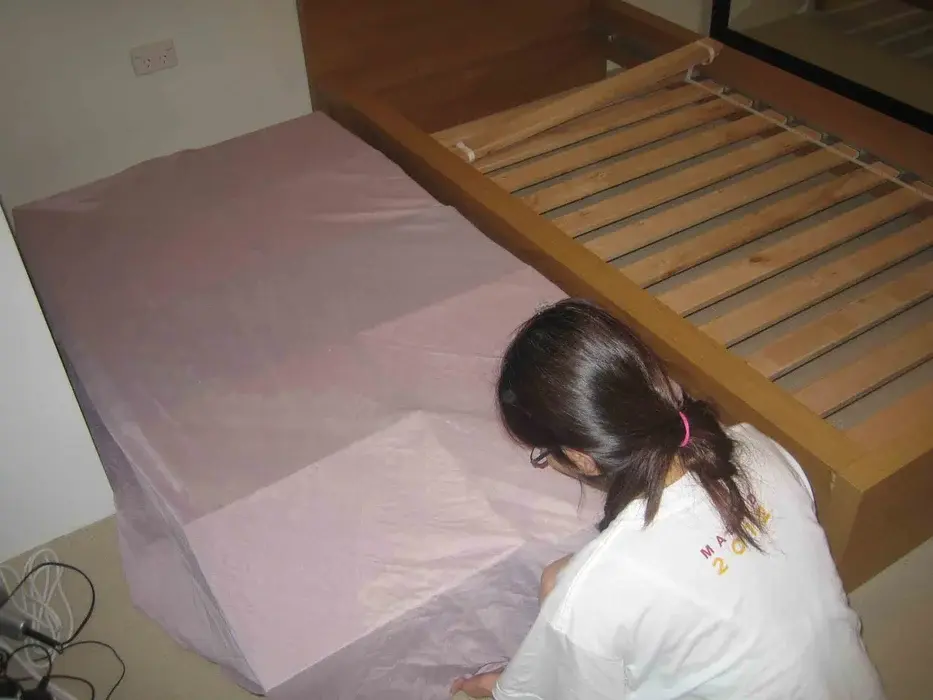
Step 3: Add the Mattress

"</p

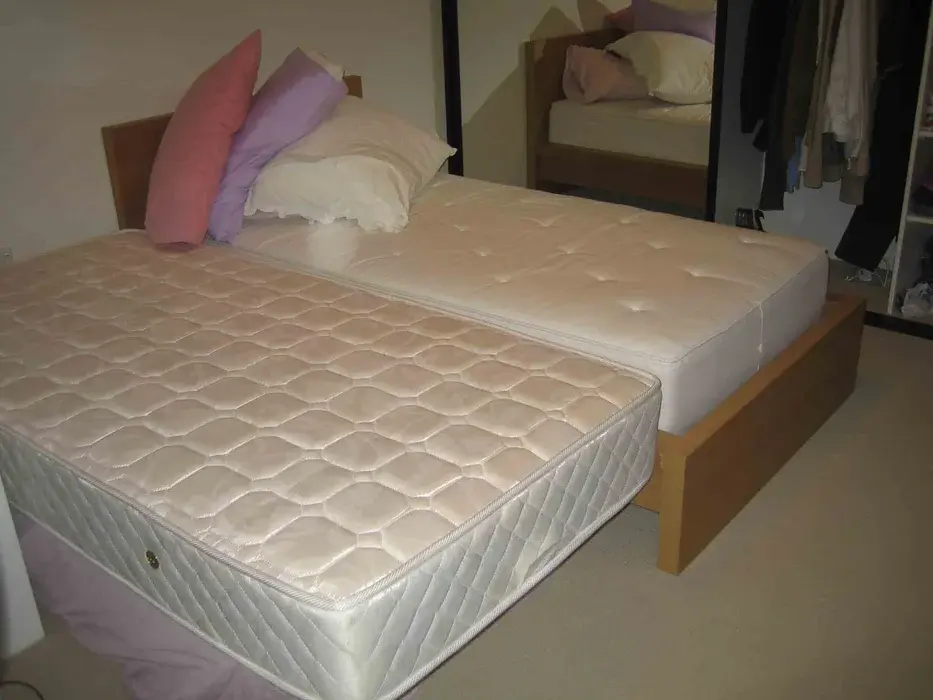
Simply place your mattress on top. The bed ended up being the same height as a standard Ikea bed frame, so it worked out well.

When it’s time to move, you can flatten the boxes or use them for packing. Plus, you’ll have handy storage space under the bed right away.

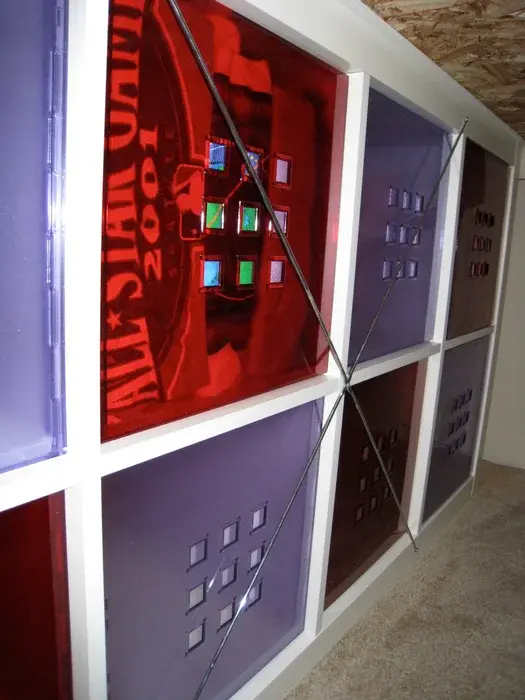
5. DIY Underbed Storage with Ikea Expedit Bookshelves and Bed Frame

</p></div><p>I made under-bed storage using Ikea Expedit Bookshelves. It's a simple project that doesn't require cutting anything, and surprisingly, the bed is sturdy. Since I already had a bed and frame, it cost me about $400.</p><p><strong>Here's what you'll need:</strong></p><ul><li>3 Ikea Expedit Bookshelves ($90 each)</li><li>2 Ikea Observator Cross Braces 393 Version ($5 each) - Make sure to get the 39
source

I made under-bed storage using Ikea Expedit Bookshelves. It’s a simple project that doesn’t require cutting anything, and surprisingly, the bed is sturdy. Since I already had a bed and frame, it cost me about $400.

Here’s what you’ll need:

  • 3 Ikea Expedit Bookshelves ($90 each)
  • 2 Ikea Observator Cross Braces 393 Version ($5 each) – Make sure to get the 39″ version, not the 28″
  • Queen Size Mattress
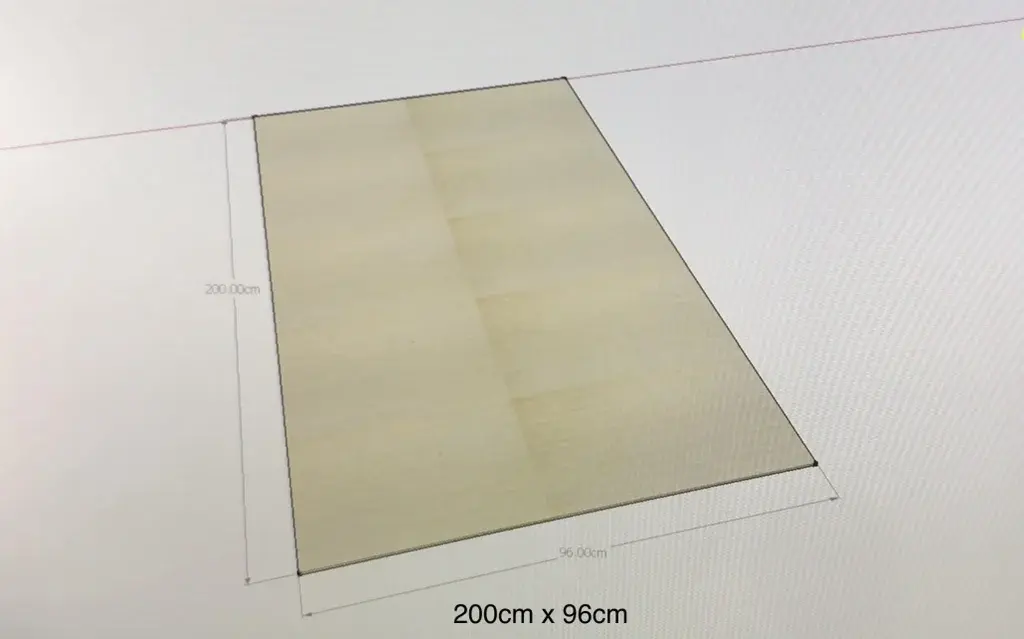
  • Queen Size Bed Frame or an 80″ X 58 5/8″ sheet of wood

Optional items:

  • Ikea Lekman boxes ($12 each; 8 fit in each bookcase; I used 8 in the bookcase at the foot of the bed; Ikea has many storage options for the Expedit Bookcases)
  • 3 Mat Shelf Liners sized at least 15.5″ X 59″ ($5-8 each)

Tools you’ll need:

  • Drill
  • Philips screwdriver

Step 1: Build the Expedit Bookshelves

</p><p>Build the Expedit Bookshelves Follow Ikea's instructions to assemble the Expedit Bookshelves. Place them evenly spaced on the floor.</p><p>Step 2: Attach Cross Braces Attach the Ikea Observator 39

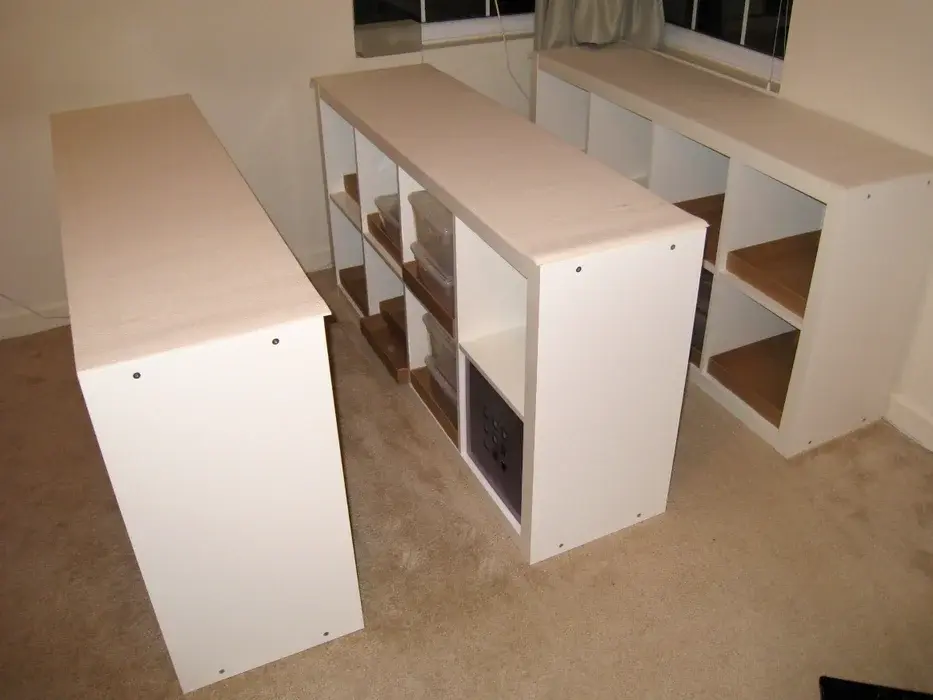
Build the Expedit Bookshelves Follow Ikea’s instructions to assemble the Expedit Bookshelves. Place them evenly spaced on the floor.

Step 2: Attach Cross Braces

</p><p>Attach Cross Braces Attach the Ikea Observator 39

Attach the Ikea Observator 39″ Cross Braces to the two end-unit bookshelves using a drill and screws. This will prevent the bed from swaying from side to side. One cross brace made the bed stable for me, but I added a second one just to be safe.

I put the cross brace at the foot of the bed on the inside (under the frame) to not block access to the storage. At the head of the bed (touching the wall), I installed the cross brace on the outside to keep access to the storage easy.

Step 3: Place Frame & Bed on Top

</p><p>Place Frame & Bed on Top To protect the shelves and provide grip, consider placing a mat liner (at least 15.5

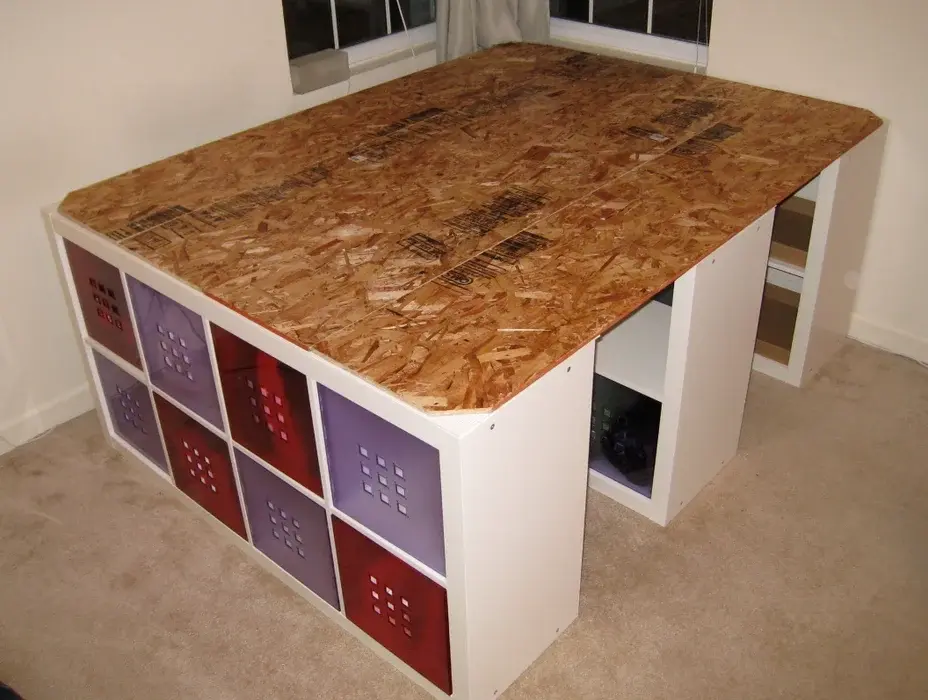
To protect the shelves and provide grip, consider placing a mat liner (at least 15.5″ X 59″) on top of them. Then, place your bed frame or the 80″ X 58 5/8″ sheet of wood on top. In my case, I used four narrower sheets of 80″ X 14 5/8″ wood.

That’s it! The bed is about 3 1/2 feet high, so kids and those under 5’10” might need a stool to get in. But if you need storage, this setup gives you lots of organized space.

Importance of a Sturdy and Stylish Bed Frame

  • Support and Solidness:great bed outline holds up your sleeping cushion well, so it keeps going longer and doesn’t sink in the center. It’s solid sufficient enough to handle heavier weights without breaking.
  • Enhanced Room Looks: The plan of your bed outline can make your room seem superior. Whether you like an advanced fashion, a classic see, or something more rural, the bed outline can coordinate your room’s style.
  • Comfort and Way Better Rest:durable bed outline keeps your sleeping pad in great shape, which makes a difference your rest superior. This is particularly accommodating if you have back or joint problems.
  • Safety and Solidness:strong bed outline keeps everything steady and secureparticularly if you have kids or pets playing around the bed.

Benefits of DIY Projects for Customization and Cost Savings

  • Support and Strength: A great bed outline holds up your sleeping pad well, so it endures longer and doesn’t sink in the center. It’s solid sufficient enough to handle heavier weights without breaking.
  • Enhanced Room Looks: The plan of your bed outline can make your room seem superior. Whether you like present-day fashion, a classic see, or something more provincial, the bed outline can coordinate your room’s style.
  • Comfort and Way Better Rest: A tough bed outline keeps your sleeping pad in great shape, which makes a difference your rest superior. This is particularly supportive if you have back or joint problems.
  • Safety and Soundness: A strong bed outline keeps everything steady and secure, particularly if you have kids or pets playing around the bed.

Conclusion about 5 diy budget-friendly bed frame ideas for men’s bedrooms

In conclusion, these 5 DIY bed frame ideas for men’s bedrooms in 2024 offer budget-friendly solutions to upgrade your sleeping space. Building your bed outline spares cash and permits for customization to coordinate your style.

A strong and smart bed outline is basic for supporting your sleeping cushion and upgrading the general see of your room. DIY ventures give the fulfillment of making a custom piece of furniture while sparing costs.

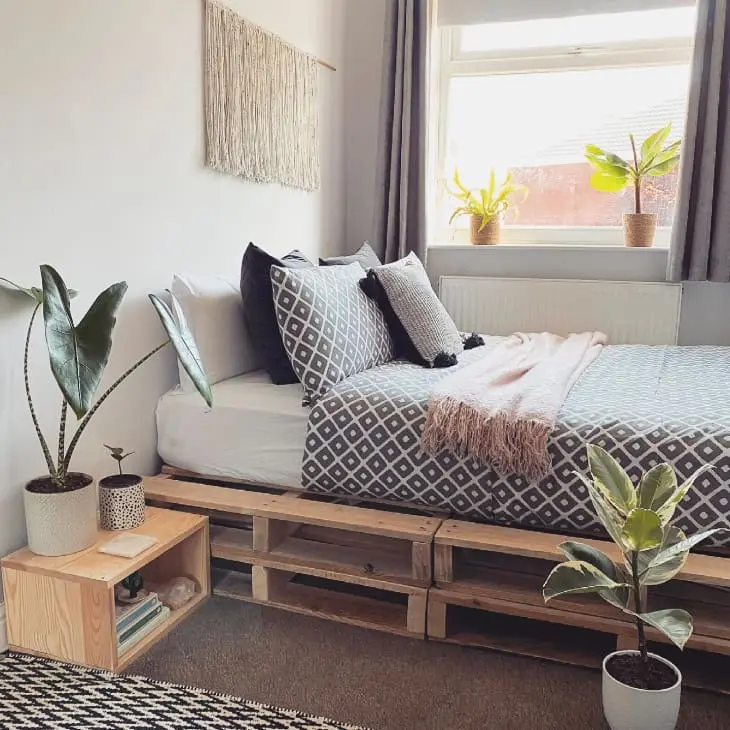
Whether you choose a minimalist platform bed, a pallet bed, or another creative design, these projects showcase the versatility of DIY solutions for a comfortable and personalized bedroom. Happy crafting!

FAQS about 5 diy budget-friendly bed frame ideas for men’s bedrooms

Certainly! Here are some FAQs about DIY budget-friendly bed frame ideas for men’s bedrooms:

Are there any specific safety concerns to keep in mind when constructing a DIY bed frame?

When building any piece of furniture, including bed frames, safety comes first. To prevent collapse, ensure that the frame is robust and well-supported. Use power tools with caution and according to all safety guidelines. In addition, consider weight capacity and stability to avoid accidents.

How challenging are these DIY bed outline plans for somebody who has no carpentry experience?

Many DIY bed outline ventures may be performed by individuals with small carpentry encounters, particularly if they take after exact step-by-step bearings like the ones given in this article. Starting with little thoughts and continuously building capacities can offer assistance to amateurs to advance to more modern ventures over time.

Are DIY bed outlines as strong as store-bought ones?

When built appropriately with high-quality materials, DIY bed outlines can final as long as store-bought ones. Appropriate support and back are significant for the frame’s strength and stability.

What are the essential benefits of building your bed outline or maybe obtaining one from a store?

DIY bed outlines give a few benefits, counting fetched investment funds, customization choices to complement your room’s stylistic layout, and the bliss of making something interesting with your possess hands. Besides, DIY ventures give flexibility in shape and scale to meet your requirements.

How much cash can I spare if I make my bed outline instead of buying one from a store?

DIY bed outlines can spare you a noteworthy sum of cash over store-bought choices. Depending on the materials utilized and your budget, making your bed outline might save you hundreds of dollars.

men’s bedroom Ideas on a budget

Hi, I'm Tuba, a digital marketer and content writer with several years of experience in my field. My expertise in Search Engine Optimization (SEO) and Content Writing has helped me create engaging and effective content that resonates with my target audience. I’m passionate about helping businesses grow and thrive by developing and executing marketing strategies that drive growth and increase revenue.

Leave a Reply

Your email address will not be published. Required fields are marked *